Monday, January 3, 2011

Making an image map

For my last post, I wanted to put together a table of photos. All of the images are on flickr already, so I just needed linked thumbnails in a neatly presented table.

First I tried making a simple HTML table, with each square holding the image reference code copied straight from flickr. Unfortunately I couldn't make it work: The “small” image size was too big, and the “thumbnail” size was too small, and it somehow just didn't look… professional enough. I decided I wanted to fill each square with as much of the image as would fit—and of course I wanted to be able to choose which part of the image would show. But how could I do that?

I needed to make my own image map. (Because the alternative was messing around with who-knows-what HTML tag attributes…)

A quick google search (how did we ever survive without google?) turned up this useful tutorial, based on Gimp which I already use for image editing, so it wasn't too hard to follow. The image map tool was very easy to use and seems to have worked just right. You can see the beautiful result here.

Creative Commons License This work by Ian Bailey-Mortimer is licensed under a Creative Commons Attribution-Noncommercial-Share Alike 2.5 Australia License.
Permissions beyond the scope of this license may be available by request.

Best of 2010

I have found it is good to stop every now and then for a little reflection. Inspired by a photographer friend, I had a look through my photos from last year and picked out some of my favourites. So without further ado, my personal best photos of 2010: (click on each photo to see it larger)


Laetitia
Fire twirlers
Eerie tunnel
Trees
Laetitia atop Hyde's Rock at sunrise
Sand dunes
Pink and purple
Wesley Church Fremantle (Uniting)
Prints available

Sunday, August 22, 2010

Light painting as a kids' camp elective

During the winter holidays this year, I was a leader on a camp for high school students called Übertweak Winter 2010. Actually, there are several Übertweak camps each year. They're all computer camps run under the Scripture Union umbrella. I used to lead on Übertweak many years ago, but took a break for a few years while living in Mackay.

On this year's camp, I ran an elective about digital photography. It was run at night, which gave us an opportunity to try some clever tricks with light painting. The idea of light painting is to keep the camera still while you move some light around within the frame, literally painting a picture with the shutter held open. The key is to remember that the camera sees—and captures—light, for as long as the film (or sensor, in a digital camera) is exposed. Dark things like a person behind a torch don't actually get seen, but the light shining out of the torch at the camera—ah, that will make a bright spot, or a streak if the torch is moved around.

Of course, you can do more than just draw diagrams. If you put a person into the picture, you can stand behind them with your torch, and create a fabulous silhouette effect, literally wrapping them in light. You just have to keep the torch properly behind the subject's body, otherwise you'll get a very bright spot where the camera could actually see the torch itself.
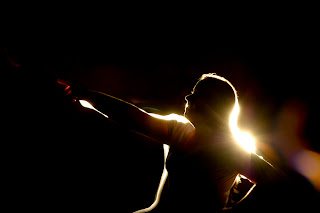
The hardest part of doing this is managing to stand still enough during the exposure. You need a camera that can give you a nice long exposure. Most SLRs have a B setting, for “bulb” (it's called that for historical reasons); if you have a cable release that's even better, as it means you don't move the camera when you press the button. If don't have a cable release with a lock, you'll need an extra helper to hold the button down. Alternatively, you may be able to ask your camera to give you nice long exposure, say thirty seconds or even two minutes. You'll probably want a medium to small aperture (f/8 or higher) to ensure you don't get stray light on the background showing up. And of course, if it's a digital camera, you can check the result right away, and have another go if you don't like what you see.

We also had some fun making ghosts, but I can't show you any of those, because the campers are all recognisable in them. Or, wait, maybe I can, if I block out their faces.
To make a photo like this, the “ghost” just has to leave half-way through the long exposure. The longer they stay there, the more solid they look. Make a test shot first, and adjust the camera's aperture so that the finished image is exposed correctly for your long shutter time.

On the last elective night, we made a group portrait out on the oval. Our “light” in this case was a hand-held laser. Who needs a flash?
(I'm the one on the left, next to me is my fellow elective leader Kyle.)


Creative Commons License This work by Ian Bailey-Mortimer is licensed under a Creative Commons Attribution-Noncommercial-Share Alike 2.5 Australia License.
Permissions beyond the scope of this license may be available by request.

Thursday, April 1, 2010

Serendipitous light-box fun

A friend had a birthday party last weekend at Casablanca, where he had reserved the downstairs area. It was a masquerade, so because I knew everyone would be dressed up all fancy, I took my good camera along.

Voice-activated light stand Dancing shadow


Towards the end I happened to spot a little alcove with a bench seat and white walls all around, and I thought, a-ha! some bounced flash fun here for sure! And indeed, with a little help from others holding flash and (for my self-portrait) camera, I did manage to make a few lovely portraits.

Laetitia

Ian


I've learnt that in these situations I need to increase the exposure quite a bit. My camera (a Nikon D70s) tends to under-expose flash photos—well, actually, it tends to expose so that the highlights are dead on 50%. This looks fine in many situations, but for nice portraits it's way too dark. But I really like the instant feedback of digital photography: I just set it on manual, chose a flash power a bit below maximum (I think these were at about 1/4), and adjusted the aperture until it looked right.

Creative Commons License This work by Ian Bailey-Mortimer is licensed under a Creative Commons Attribution-Noncommercial-Share Alike 2.5 Australia License.
Permissions beyond the scope of this license may be available by request.

Sunday, November 8, 2009

Schmap Brisbane Guide

One of my photos has been included in the latest (ninth) edition of the Schmap Brisbane Guide! You can see it here.

Sunday, August 16, 2009

Weekend Landscapes

DPSCane season (by Ian B-M) had a Weekend Landscape Photography Challenge this weekend. So I went for a drive this afternoon and took a few photos. Here's what I came up with.


Creative Commons License This work by Ian Bailey-Mortimer is licensed under a Creative Commons Attribution-Noncommercial-Share Alike 2.5 Australia License.
Permissions beyond the scope of this license may be available by request.